Logic
Reverse Reverb in Logic
Beat Slicing in Logic
Comping in Logic
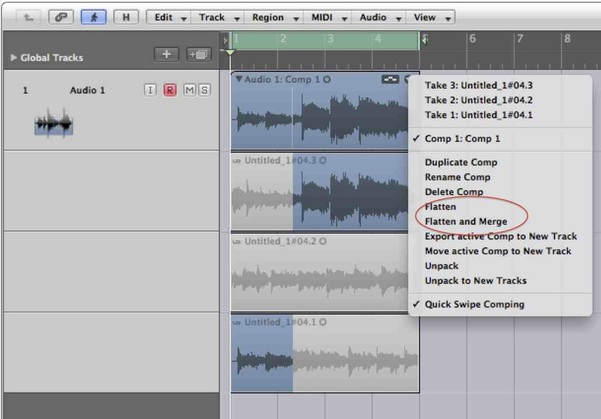
Comping in Logic is easy and intuitive. When a loop is selected in the timeline, Logic will automatically do loop recording and create multiple takes. Once the recording is done, simply drag across any part of a take to audition it and select the required sections.
The takes interact, so it is very quick to build a comp. In this picture you can see that the bottom take starts and then switches to the top take just after the second beat of bar 2 (this location is shown with a thin white line).
Once the whole thing sounds right access the menu by clicking on the right-top triangle. Select Flatten to reduce to one track (with crossfades), or Flatten and Merge to make the Comp into a single region.
Logic Tutorial
Dr. Rik Pfenninger at the Plymouth State University has put together a series of good tutorials for Logic 9. Find them here.
Link Modes
Symbols (glyphs) in the Audio Bin
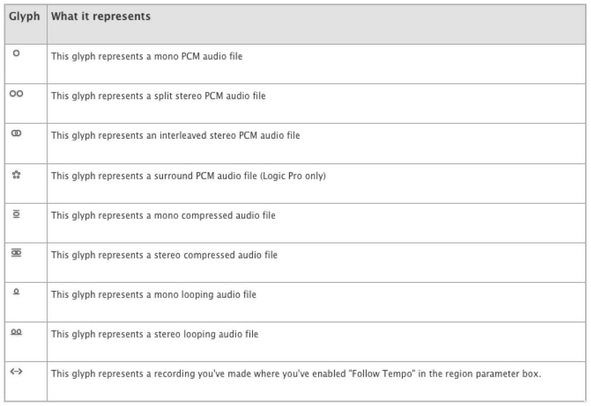
Here is a list of the file type symbols that can appear in the Bin. Full information is in this Apple article.
In the second column a metronome or clock symbol can show.
The Clock icon means it is a time-stamped audio file.
The metronome shows on Apple AIFF files (which have tempo info). Compressed files (e.g. CAF) don't show the metronome (but they do contain tempo info).
In the second column a metronome or clock symbol can show.
The Clock icon means it is a time-stamped audio file.
The metronome shows on Apple AIFF files (which have tempo info). Compressed files (e.g. CAF) don't show the metronome (but they do contain tempo info).
Logic Time
Realtime:
Hrs Mins Secs Frames (max set by frame rate) Bits (80)
Music Time:
Bars Beats Sub-beats (set by divisions) Clicks (240)
Thus there are 960 clicks per quarter-note, so in 4/4 time at 120bpm there will be 1920 clicks per sec.
Playhead:
If you grab the playhead (on the green triangle) and drag, it will move in increments of 40 clicks.
By holding OPTION after clicking on it: it will move 4 clicks at once.
Where Logic stores Loops and Samples
EXS24 sampler file organization
1. Instrument files (.exs)
Note: sub-folders must contain instrument files to appear in the EXS24 menu.
2. Factory Instruments
3. Sample files (.wav)
1. Instrument files (.exs)
- These are kept in ~Library/Application Support/Logic/Sample Instruments
Note: sub-folders must contain instrument files to appear in the EXS24 menu.
2. Factory Instruments
- These are kept in Library/ Application Support/Logic/Sample Instruments
3. Sample files (.wav)
- These can be stored in any location
- Library/Audio/Apple Loops
Apple Loops (GarageBand, Soundtrack Pro, Ilife, Jam Packs):
Logic Pro key commands
Logic has an abundance of possible key commands (keyboard shortcuts). There are hundreds of them and some functions are only accessible from key commands. It is also possible to set your own, and/or change the default ones. A list of the non-editable ones is on this forum.
Here is a handy list of the most useful ones:
Here is a handy list of the most useful ones:
| logic_x_keyboard_shortcuts.pdf |
Logic Pro
A quick guide to Logic in a "how do I ..." format. The Contents link to relevant sections of the document.
| logic_essentials.doc |
Pro Tools vs Logic Audio automation
| logic_vs_pro_tools.pdf |
Pro Tools vs Logic Audio - editing timing
Which technique to use to get parts 'in time' can be a bit confusing. Here is a handy reference chart describing the processes available in Pro tools and Logic Audio.
| editing_timing.pdf |
Using Video in Logic
In version 9 the video sub-menus are under the File menu (in version 8 they are in the Option menu). Once the video is imported it will automatically open a video float window. Click the Global Tracks and Video triangles to show the video track. The floating window can be resized by pulling the bottom right corner. If you close the floating window and want to reopen it; double-clck on either the movie at the top of the Inspector, or any movie frame on the timeline. When the project is finished use the 'export audio to movie' submenu to bounce the audio along with the video. Logic has a handy 'detect cuts' feature that will automatically create markers at scene changes (the button in the video track header). For spotting within scenes create markers manually to compile an EDL in the markers window (lists>marker tab).
There is no way to accurately set markers to frames, but by setting the division value (ie grid resolution) to 96 or more (in the transport window) sufficient accuracy of marker positioning is obtainable (at the default BPM of 120 the resolution at the maximum of 192 would be
10.42 mS so this gives 1/8th frame accuracy at 25 fps).
